Update, reset, or reinstall
Updating the NEC MediaPlayer

When an update is available for the NEC MediaPlayer, a notification dot will appear in the upper-right corner of the screen on the "updates" icon.
-
Connect the monitor to a LAN with internet connectivity.
-
Navigate to the update icon.
-
Select [Update and restart].
-
Press SET (IR remote control) or Enter (USB keyboard) to download and install the update.
Note: during the update process, the screen will blank out and the NEC MediaPlayer will reboot several times. Do not turn off the monitor power during this process. The NEC MediaPlayer will return to the main screen when the update is complete.
Performing a factory reset
Perform these steps to return the NEC MediaPlayer to the installation defaults.
To perform a factory reset:
-
Go to Settings [
 ].
]. -
Go to [Other].

-
Select [Factory reset].
-
Press SET (IR remote control) or Enter (USB keyboard).
-
Select [Confirm].
-
Press SET (IR remote control) or Enter (USB keyboard).

Note:
-
While the reset is in process, the screen will flash several times and go blank for a couple of minutes. Please be patient and do not disconnect the power. When the reset is complete, the NEC MediaPlayer restarts and returns to the Files screen.
-
If an update has been downloaded and installed, the reset will reset to the updated version of the NEC MediaPlayer.
-
All media content on the Internal storage (including Playlists), preferences, and the Browser Client's login will be erased, and the device will be disconnected from the NEC MediaPlayer network.
Reinstalling the NEC MediaPlayer
You can download and install the latest NEC MediaPlayer image from our website and install it from a computer connected to the monitor.
-
In a web browser, go to https://www.sharpnecdisplays.us/support-and-services/raspberrypi.
-
Click the Downloads link.
-
Select and download the NEC MediaPlayer installer (it will be a compressed .zip file).
-
Save the file to your computer and unzip it.
The file must be uncompressed to be used in the following installation instructions.
Reinstalling on a Compute Module 3
Download the image installer:
-
Download and install either the Etcher (recommended) or Win32DiskImager tool from the following locations. This will be used to write the OS .img file to the Compute Module:
-
Download and install the Compute Module boot installer. This will install Windows drivers for accessing the Compute Module.
https://github.com/raspberrypi/usbboot/raw/master/win32/rpiboot_setup.exe
-
Power up the Compute Module in USB boot mode:
-
Make sure the USB cable is directly connected between the host PC and the display.
Do not use a USB extender cable or hub between the host PC and the display. Use as short a USB cable as possible.
-
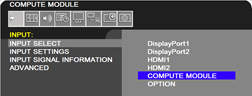
On the NEC display select the [COMPUTE MODULE] video input.
-
Press MENU on the IR remote control to open the OSD menu.
-
Highlight the [C MODULE] menu and press SET.
-
Select [POWER].
-
If [POWER SUPPLY] is currently [ON] then change it to [OFF] and confirm.
-
Select [SERVICE MENU].
-
Select [SETTING LOCK] and then select [OFF].
-
Enter the passcode. The default is 0 0 0 0.
-
Select [USB BOOT MODE] and then select [ENABLE].
-
It is also recommended setting [SHUTDOWN SIGNAL] to [DISABLE] and [WDT] to [DISABLE] during programming.
-
Exit two levels and navigate to the [POWER] item on the [C MODULE] menu.
-
Select [POWER SUPPLY] and then select [ON].
Important: If the display goes into standby mode or Compute Module is powered off and on, it will automatically cancel USB BOOT MODE. Be sure to check that the boot mode is as intended if the process needs to be restarted.
-
-
Run the Win32DiskImager or Etcher tool and select the downloaded OS .img file from step 4 of the previous instructions (for downloading the .img file from the Sharp NEC Display Solutions website).
If using Etcher:
-
Launch the Etcher application.
-
Select the downloaded OS .img file as the source image.
-
The Compute Module should automatically appear as the destination drive.
-
Click “Flash!” to begin writing and verifying the image. This process should take approximately 5 to 15 minutes.
-
When finished, the drive should contain the boot files for the OS.
If using Win32DiskImager:
-
Run the Compute Module boot application “rpiboot”, installed on the “Raspberry Pi” Windows Start menu. A window should appear with “
Waiting for BCM2835/6/7”.Note: The Compute Module boot installer makes the Compute Module appear as a USB mass storage device to Windows. This step must be performed each time the Compute Module is placed into USB Boot Mode and powered on.
The “rpiboot” command window should show some text and disappear.
A new mass storage device should show as a new drive letter on the host PC. Windows may display a message saying the device needs to be formatted before use – ignore this message as it will be formatted by imaging it.
See the “Troubleshooting” section on page 58 of this guide if a new mass storage device doesn’t appear.
-
Run the Win32DiskImager tool and select the downloaded OS .img file.
-
Select the new drive as the Target Device. Make sure the correct drive is selected as all data will be overwritten.
-
Write the file to the Compute Module. This should take approximately 5 to 15 minutes.
-
When finished, the drive should contain the boot files for the OS.
Note: The display may go into a power save mode because there is no signal from the Compute Module (the power led will flash green). The internal Compute Module will remain powered on and can be flashed.
Important: If the display or Compute Module is powered off and on, it will automatically cancel USB BOOT MODE. Make sure the boot mode is as intended if the process needs to be restarted.
-
-
The Compute Module in the display can now be restarted in normal mode to boot the device:
-
On the NEC display select the COMPUTE MODULE video input.
-
Navigate to the COMPUTE MODULE menu on the OSD.
-
Navigate to the SERVICE MENU item on the COMPUTE MODULE menu.
-
If the USB BOOT MODE setting is still set to ENABLE change it to DISABLE.
-
Navigate to the POWER item on the COMPUTE MODULE menu.
-
Select POWER SUPPLY to OFF.
-
Wait for power to the Compute Module to be shutdown. When navigating back to the same menu item it should now show POWER SUPPLY OFF.
-
Select POWER SUPPLY to ON.
-
-
The boot-up sequence for the NEC MediaPlayer should be seen on the screen.
Reinstalling on a Compute Module 4
Download the image installer:
-
1. Download and install either the official Raspberry Pi Imager application (recommended), balenaEtcher or Win32DiskImager tool from the following locations. This will be used to write the OS .img file to the Compute Module:
-
Download and install the Compute Module boot installer. This will install Windows drivers for accessing the Compute Module.
https://github.com/raspberrypi/usbboot/raw/master/win32/rpiboot_setup.exe
-
Set the Compute Module to boot mode for programming.
To set programming boot mode:
-
Turn off the display’s AC power switch.
-
Connect a USB cable from the USB Micro-B connector on the Interface Board to the host PC.
-
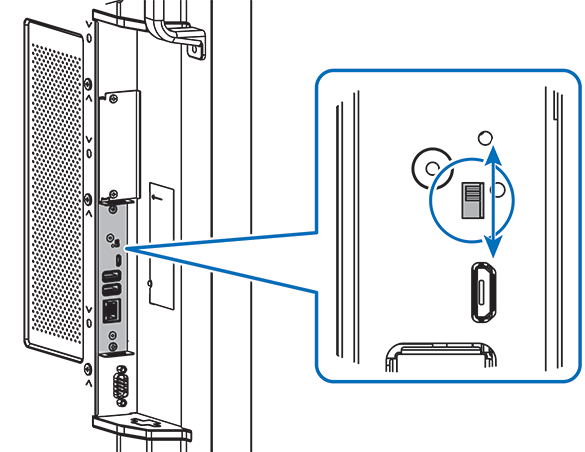
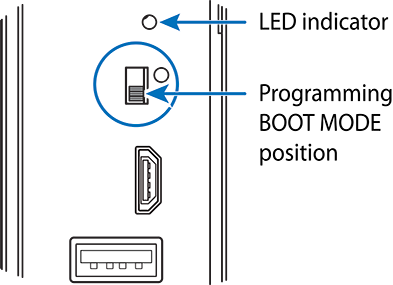
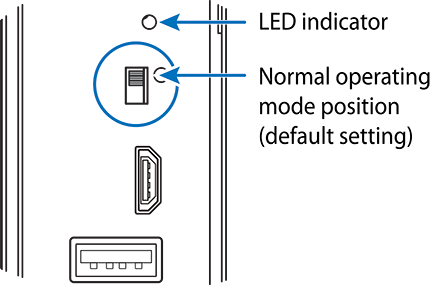
Move the BOOT MODE switch on the Compute Module Interface Board terminal panel to the programming boot mode position.


-
Turn on the display’s AC power switch.
-
Verify that the Compute Module is powered on.
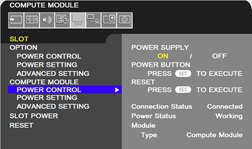
In the OSD menu, navigate to [SLOT] > [COMPUTE MODULE] > [POWER CONTROL] > [POWER SUPPLY] and make sure [ON] is selected (displayed in yellow).

-
Verify that the Compute Module is powered on by looking at the LED indicator next to the BOOT MODE switch. The LED should be red when power has been applied to the Interface Board.
-
-
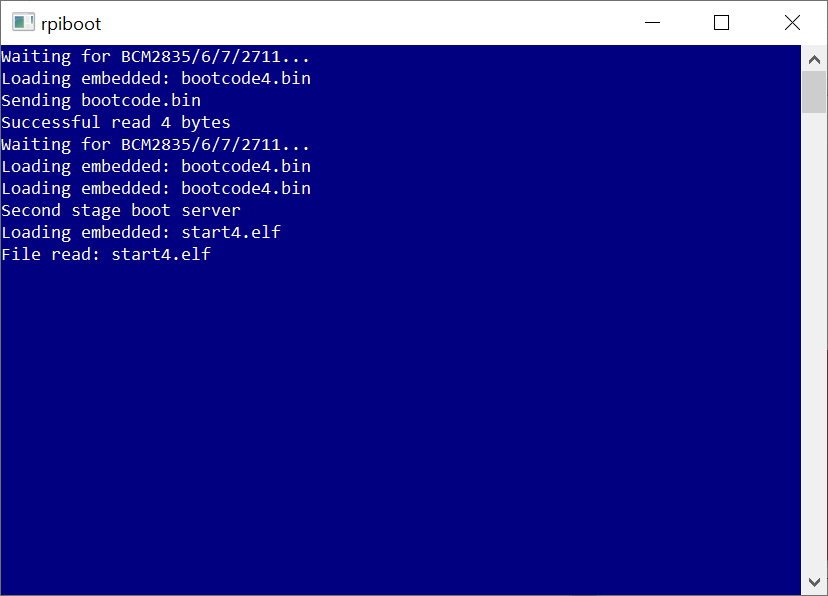
Run the RPiboot application installed by the Compute Module boot installer by selecting “rpiboot” from the Windows Start menu. A command window like the one shown below should appear and close within a few seconds.

The indicator LED next to the BOOT MODE switch will turn from red to orange color.
At this point Windows may show a message that a new unformatted drive has been connected – do not open or format the drive.
If the window stays open and displays only “Waiting for BCM2835/6/7/2711…” then the Compute Module has not been detected.
Note: The display may go into a power save mode because there is no signal from the Compute Module (the power led will flash green). The internal Compute Module will remain powered on and can be flashed.
Important: If the display or Compute Module is powered off and on, it will automatically cancel USB BOOT MODE. Make sure the boot mode is as intended if the process needs to be restarted.
-
Use the Raspberry Pi Imager, balenaEtcher, or Win32DiskImager tool to write the OS image file.
-
Run the tool.
-
Select the downloaded OS .img file as the source image to write to the Compute Module.
-
Select the Compute Module “drive” as the target.
-
Click “Flash” or “Write” to begin writing and verifying the image. This process should take approximately 5 to 15 minutes depending on the size of the OS image file.
-
When finished, the drive should contain the boot files for the OS.
Note: The imaging tool may “eject” the Compute Module’s drives when writing and verification is complete. If so, disconnect and reconnect the USB cable to the PC and the drives should reappear.
-
-
The Compute Module in the display can now be restarted in normal mode to boot the device.
-
Turn off the display’s AC power switch.
-
Disconnect the USB cable from the USB Micro-B connector on the Interface Board.
-
Move the BOOT MODE switch on the Compute Module Interface Board terminal panel to the normal operating mode position.

-
Turn on the display’s AC power switch.
-
Verify that the Compute Module is powered on.
In the OSD menu, navigate to [SLOT] > [COMPUTE MODULE] > [POWER CONTROL] > [POWER SUPPLY] and make sure [ON] is selected (displayed in yellow).
-
Make sure the Compute Module is the selected input for the display.

-
-
The boot-up sequence for the NEC MediaPlayer should be seen on the screen.